It is way too hot to wear anything but dresses in the summer, but finding ones that are casual, the right length, fit correctly, and are still modern is a real chore. Off-the-rack cheap-o dresses like those you find at H&M and Forever21 are definitely not designed for a “womanly” body.
If the boobs and the butt fit, you usually end up with a whole bunch of extra loose fabric around your waist. But if you buy a size to fit your waist, then the fabric across your boobs and butt stretches too far and gets those awkward horizontal lines, and it rides up when you walk.
But the prices are so right that I just can’t help myself! So instead of getting mad that the $20 dresses don’t fit, or getting frustrated and not buying them at all, I buy the size that fits my curvy bits and nip in the waist at home.
This week’s alteration is another that I use all the time. It’s taking a simple boxy dress and turning it into a more “hourglassy” shape. You can also use this on tunics and pretty much any oversized shirt as long as the armpits and shoulders fit okay. It works best with stretchy fabrics.
Materials: ill-fitting dress, pins, needle, thread, white chalk
Project time: 20 minutes
Click below to read the illustrated instructions.
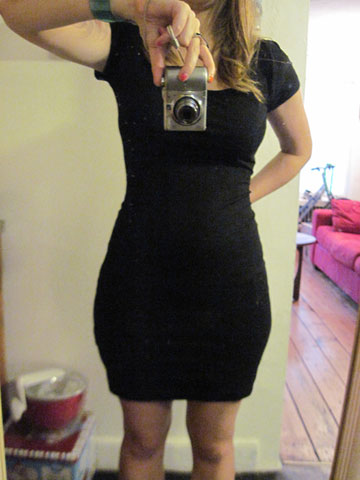
1. Here’s a photo of me in the dress I started with. It’s a plain black tee-shirt dress from H&M that I purchased a couple weeks ago for only $12 (and it’s still in stock if you want your own!). It seemed to run a bit small, because I purchased a size small and I usually go for a medium or large in this style dress (my measurements are about 36″-28″-40″). You can see a lot of wrinkles and lumpiness around my waist area, but the rest fits pretty well.
2. Here’s a picture of me pulling it tight from the back. This is how it should fit. Note: It’s a good idea to wash the garment before beginning, though I usually don’t bother. But if you plan on washing the garment in hot water and/or putting it in the dryer, where it’ll shrink, then I highly recommend you wash it first. Otherwise, your alteration could end up changing in the wash.
3. Start out by putting the dress on inside out. It’s a good idea to walk around a little bit now, to ensure that the dress is sitting on your body the way it would be throughout a day of normal movement.
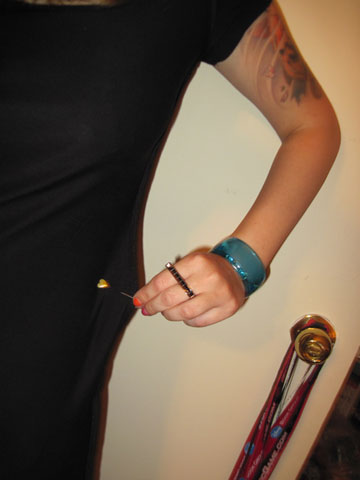
4. Grab a couple pins. Stand in front of a mirror and pinch in the dress on each side of your natural waist to get an idea of how much excess fabric needs to be taken out. Don’t pull too tight—you’re trying to match your actual measurements, not make the dress overly skin-tight. Stick a pin through both layers of fabric with the pinhead entering at the exact point of the inside of your pinched amount. Do this on both sides of the dress. Or you can be lazy (like me!) and just do one side, then make the other side the same once you take off the dress.
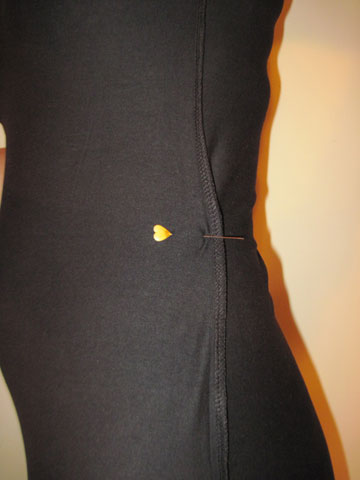
5. When you let go, the fabric will automatically lay flat against your body, like in this photo of my left side.
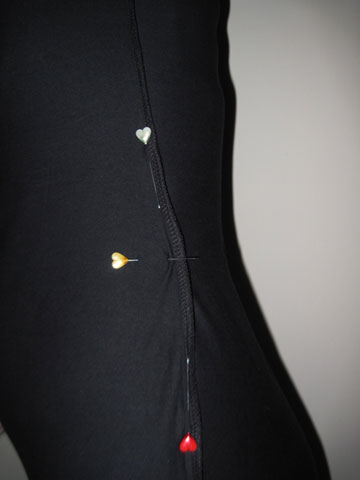
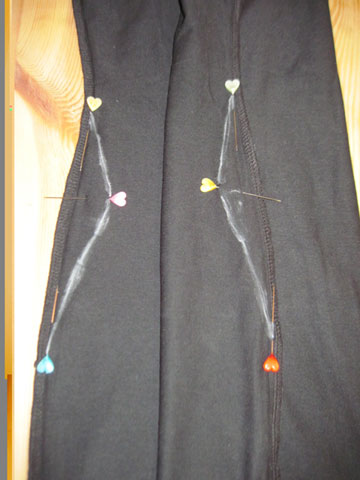
6. To determine where your sewing line will match up with the existing seam, pinch the fabric just under the pin and run your fingers down the folded fabric. When you reach the existing seam, place a pin in the fabric vertically, with the pinhead entering at the exact point where your new seam will meet the existing one. Do the same thing with the topside of the horizontal pin as well. When you’re done, it’ll look like this:
7. Now carefully take off the dress, avoiding accidentally pushing out the pins or pricking yourself.
8. Lay the dress down flat on a clean surface. Then line up each side against the other (like a sandwich) to ensure that both sides were pinned equally. If both sides are way off, you may want to adjust the pins a bit to keep things more symmetrical. Or if you only pinned one side, now is when you’ll add pins to the other side to match up.
9. With the dress laid flat, outline with chalk where you’ll be sewing. Keep the angles gently curved, not pointed, to ensure the seams stay smooth. You want the new seams to be shaped like an hourglass, not like a triangle. If the angles are too sharp, the dress will give you pointy hips.
10. Now sew along your chalk marks. Start a couple inches above where your chalk line begins, and follow the existing seam. Ease into your chalk line from the seam. It’s okay if you’re not exactly on the chalk line; it’s more important to make sure you’re creating a nice, curved line. You do not want any perfectly straight lines. When you get to the bottom of the chalk line, also continue along the existing seam for a couple inches. Repeat for the other side of the dress.
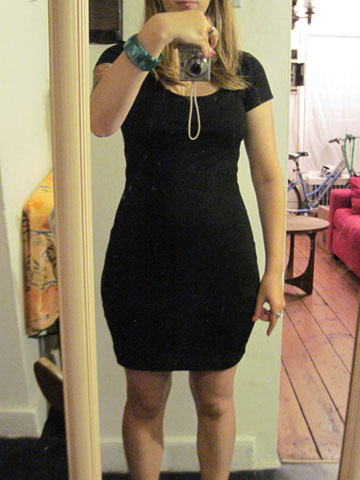
You are done! Brush off the chalk and turn the dress right side-out. Try it on. If it’s not quite as tight as you’d like, you can follow the same process again, this time with the new seams you just created. You can even start much higher up on the seams to make the whole torso tighter, all the way up at the base of the armpit if you want. Here’s a photo of my finished product:

Just to be clear you did not use sewing machine
No, I used a sewing machine. I use one for pretty much everything except extremely delicate fabrics.