With great brands that cater to large busts, we have more clothing options than ever before. However, full bust brands can’t yet design for every busty woman’s style, and mainstream brands aren’t ready to change their size options. Alterations are another option to help us achieve both personal style and perfect fit. In this new monthly column, Leila Breton of Three Dresses Project tackles our full bust fit challenges.
Can busty women wear tunics without a belt? That’s the question today. Darlene posted pictures and asked readers, “Can this tunic be saved? Should I learn how to sew and alter my clothes?”
Taking your alterations into your own hands can be a powerful move. When I started needing more alterations to patterns, I practiced on clothes from second hand stores. I wasn’t quite ready to make an entire top and I didn’t mind cutting apart someone’s old shirt.
What I tend to do is buy several sizes above my own so that I have enough fabric to cut away, still leaving enough room for my bust. My shoulders are narrow, largely by comparison to my bust and hips, and I also have learned that I can achieve a quick and easy fit if I cut the back smaller than the front.
The side seams should be in the middle of my torso, not the middle of my bust circumference, if that makes sense. By cutting a smaller back and adding to just the bust area, I minimize the amount of fabric that usually drapes from the fullness of my bust.
When I saw Darlene’s blog post, I went out and bought some warm and fuzzy tops that I thought I could alter. I first go for colors I like since I’ll be adding the shaping. It was particularly cold that weekend, so I went for a lot of fleece, which normally is comfortable and warm but so unflattering that I’ve actually never bought any fleece tops for myself. That changed.
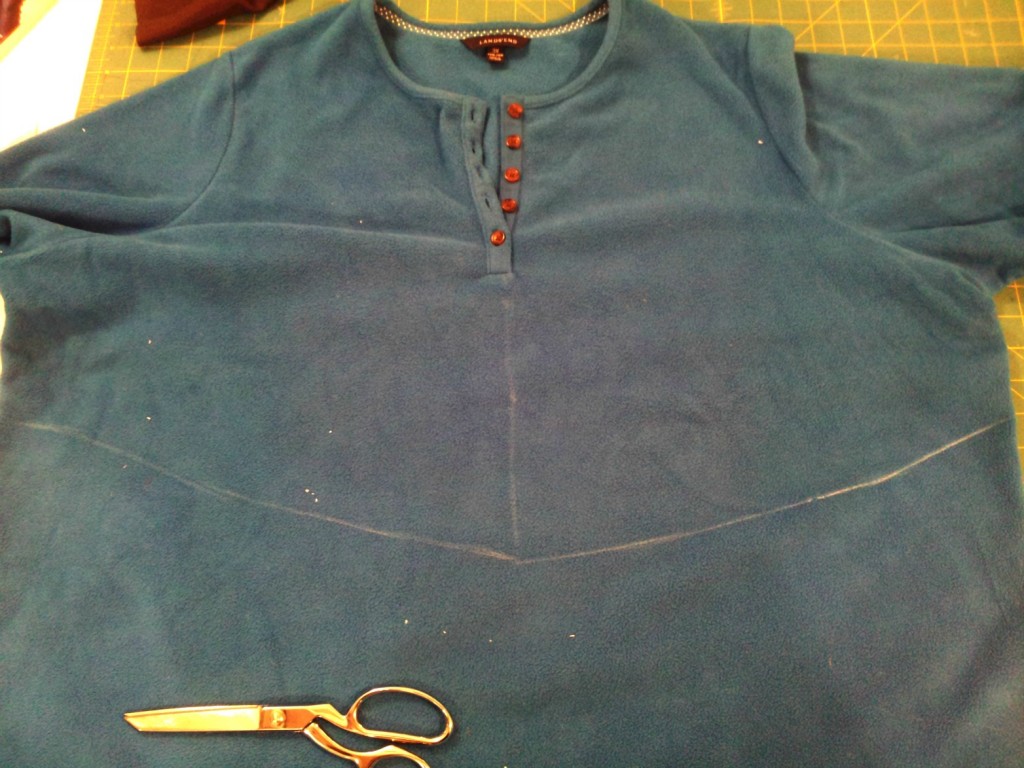
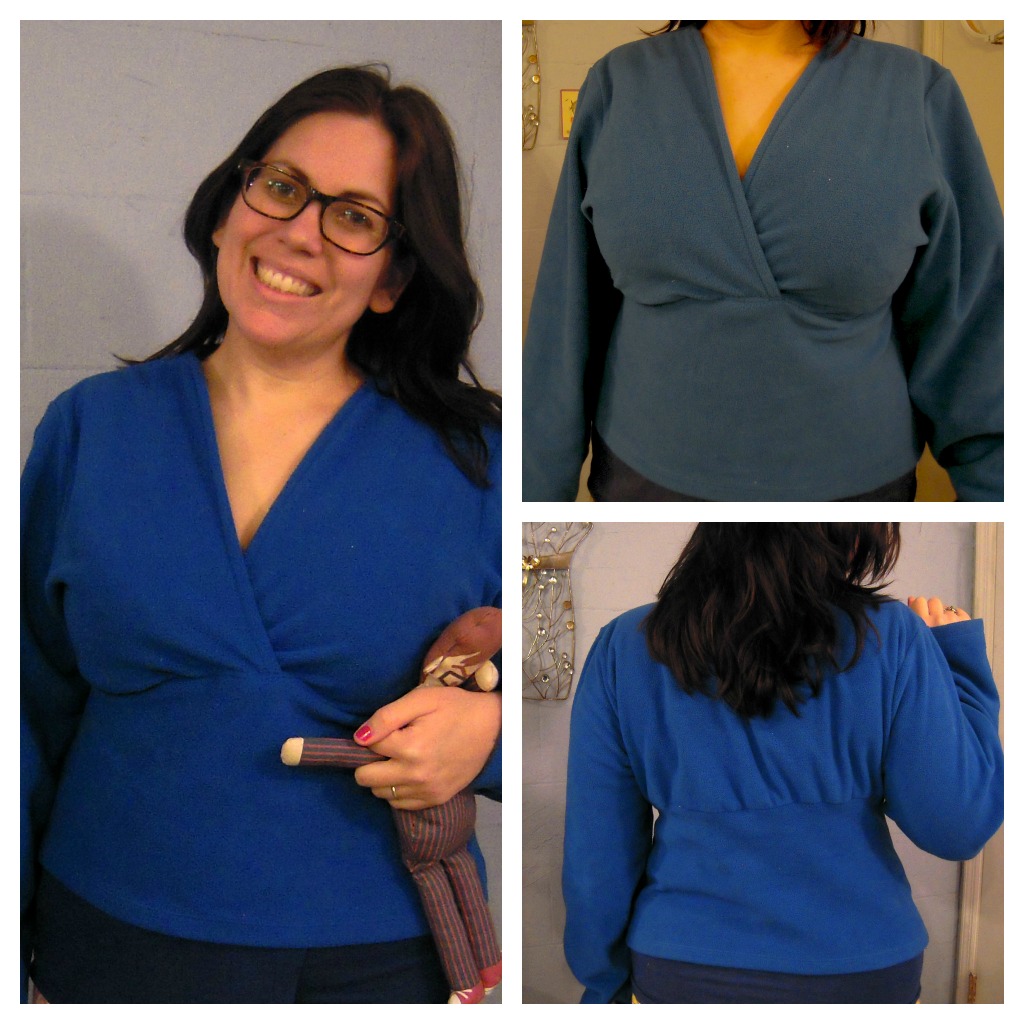
While not quite a tunic, I wanted to experiment a little. This fleece top from Lands End started as a 3x size. As you can see below it was a rectangle, so I took a bodice pattern and traced it so that I could cut it into two front pieces right through the button placket,crossed them and then added the rest of what used to be the top to the bodice for a more fitted, but loungey top.
I used Vogue 8649 to create this alteration and I’ve found myself wearing this top a lot around the house. I left the sleeves baggy to continue that loungey vibe. What do you think?
I also played with a very simple, yet effective, alteration to a pink top made of another synthetic and plushy fabric with a bit of a pile. Again, a rectangle of doom. The photo on the right shows a gentle shaping on the sides and again I left the sleeves as is for a comfy loungey look. I still took the back in more so than the front which required
- cutting up the side seams,
- trimming down the back to my back measurement plus ease (movement and comfort) and
- stitching up the sides.
Of course, you do end up with a much larger front but if you go off your measurements you should end up with a nice look.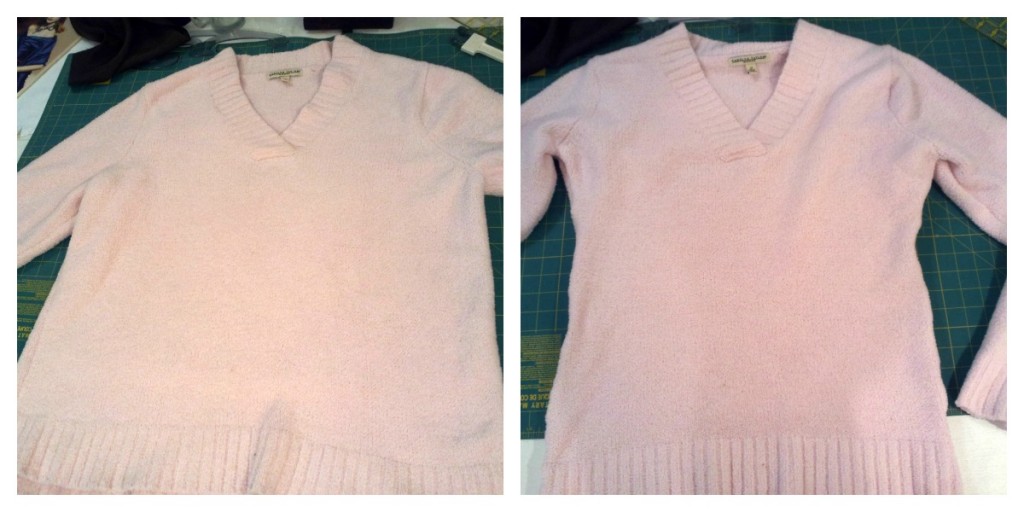
Would these alterations work for a longer tunic? In theory, yes. Buy a couple of sizes larger than your own, cut a smaller back if you need it (I’m a US 34H and could stand to go down a band size/up a cup) and test it out.
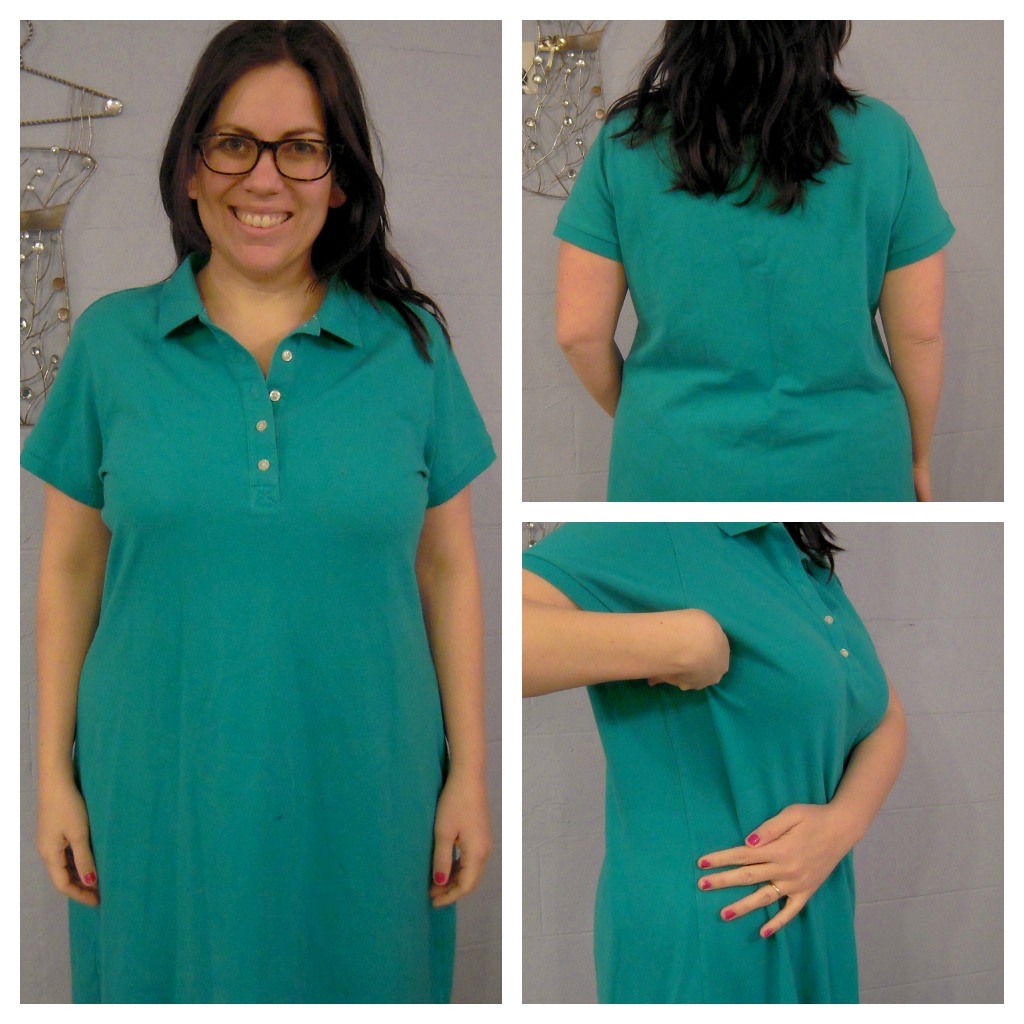
I did find what I’m guessing was meant to be a dress from the second hand store, also a Lands End brand and a size 1X. If I don’t plan on altering, I buy a L- just for reference.
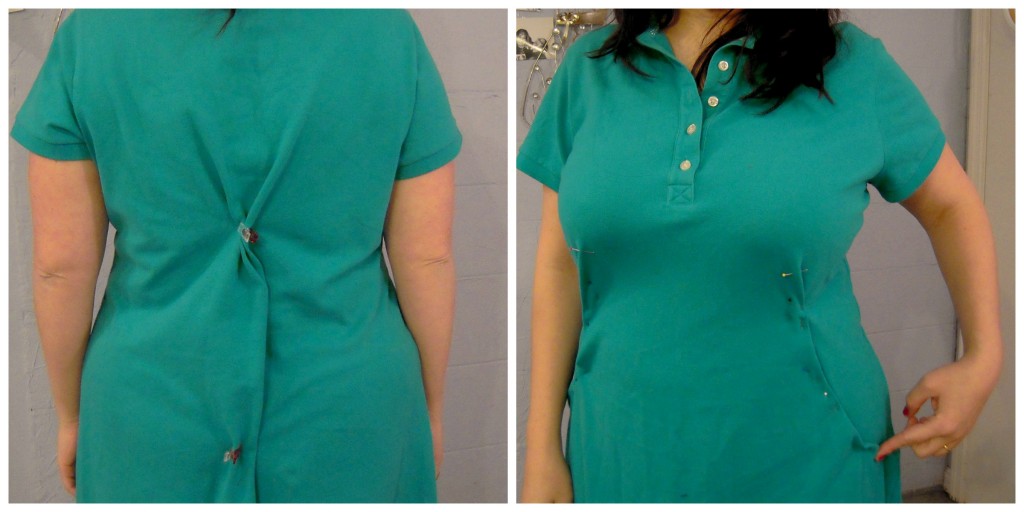
Here’s the top/dress before:
It had some shaping and I’m guessing in my own size I could probably just wear it as is. The shoulders aren’t too wide. I find dropped shoulders to just scream lounge, something I’m not always looking for. Today I am looking a lounge. In the third picture, I’m trying to point out where I want the side seam to lay.
In general, you want to alter the back first and then alter the front, so I took in the back and then pinned the front much like Darlene had. I think this would work.
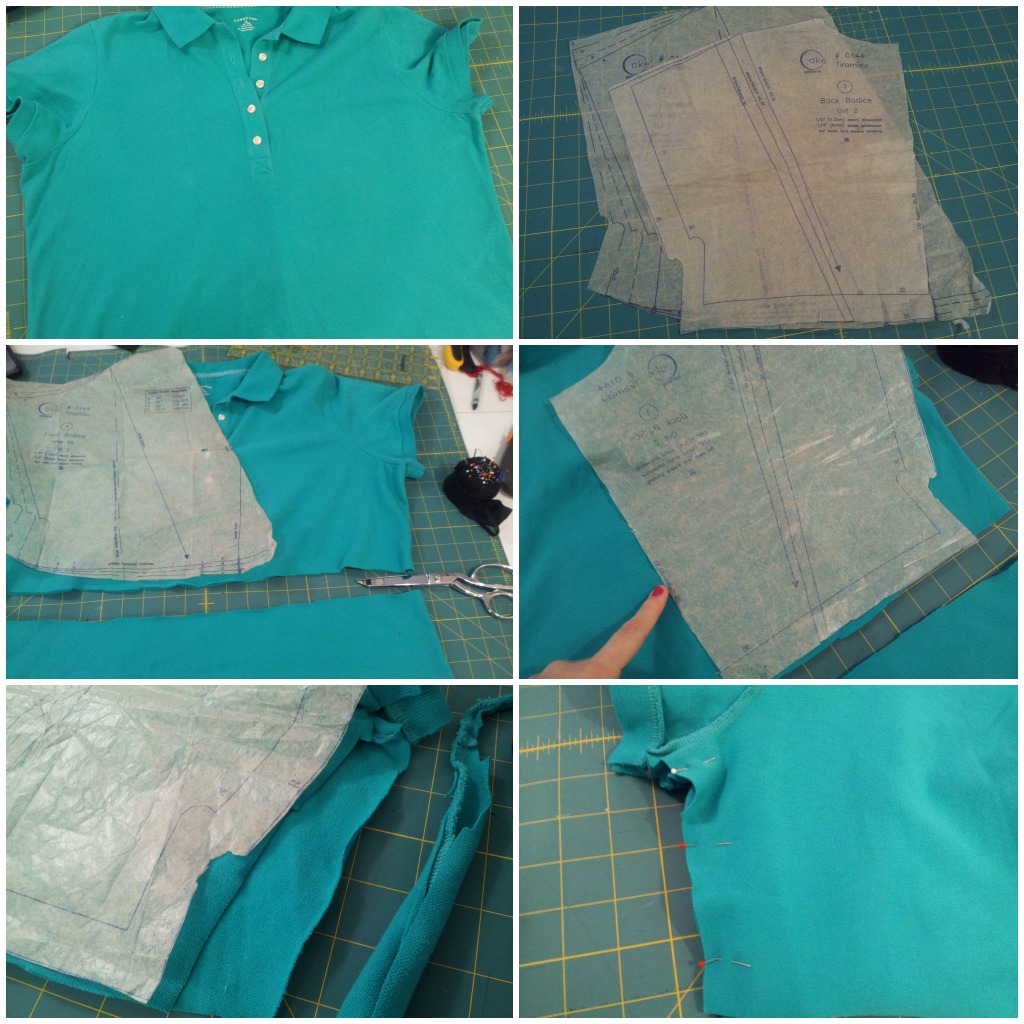
But then I wondered if I could take a TNT (tried and true) pattern and create a slightly different look, which would involve a bit more sewing. Not very complex, just a little more time consuming. The pattern I used for this alteration is the Tiramisu Knit Dress from Cake Patterns, an indie pattern company that I work for. It’s a great pattern for larger busts.
- Lay the dress flat on a table and place the front bodice pattern on top, placing Center Front as marked on the pattern with the center of top.
- Cut a straight line to create a bodice piece out of the dress.
- Place the back bodice piece against the back of the top of the dress, matching Center Front.
- Trim the side of the back if you need a narrower back.
- Right sides facing, stitch the front and back “bodice” pieces together. Check for fit.
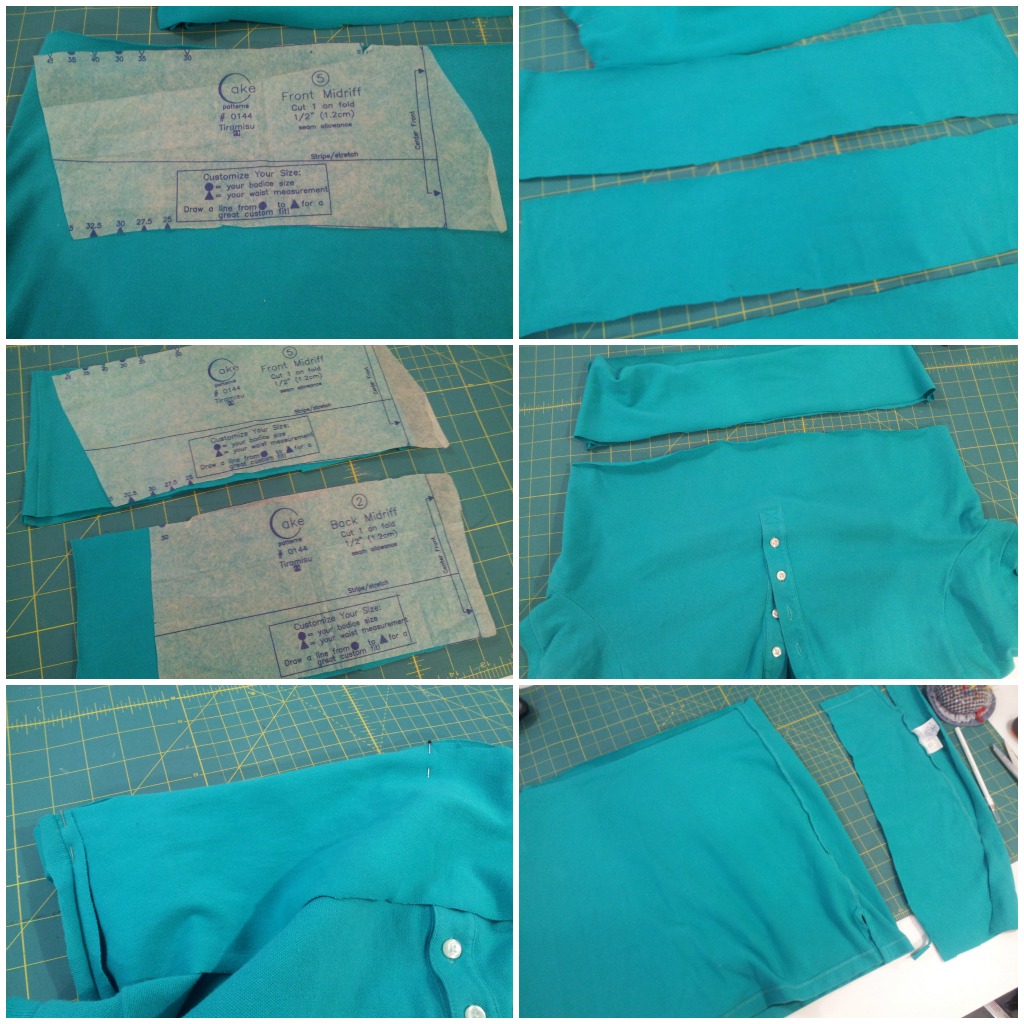
- Place the front midriff pattern piece on top of the newly cut edge of your dress.
- Rough cut the width of the midriff section.
- Cut the front and back apart by cutting the sides at the seams. You should now have two narrow pieces of fabric. These will be for your midriff.
- Fold the long pieces in half and place the front midriff pattern on one and the back midriff pattern on the other. Trim the fabric to the midriff size. What I like about this wider midriff section is that my waist isn’t cut off by a seam. Instead, there is a seam just below my bust and another seam at around the top of my hip, creating the illusion of a longer torso. Sometimes I like creating an illusion but not always.
- Stitch the front and back midriff sections together, with right sides facing, at the side (short) seams. You will now have a tube.
- (Optional) You can add two rows of gathering stitches to make easing the bodice into the midriff section if you like or feel you need it. I didn’t do this step and I think my dress/top would’ve looked nice with a gentle gather below the bust. The pieces would’ve fit together better.
- With right sides facing, match up the side seams of the midriff to the side seams of the bodice, easing but without stretching.
- Place the rest of the dress, now the “skirt”, along the edge of the midriff, and trim off the excess, keeping the side seams even.
- With right sides together, stitch up the cut side of your skirt. Or both sides, if you took off excess from both.
- With right sides together, and matching at the side seams, stitch up the midriff to the skirt.
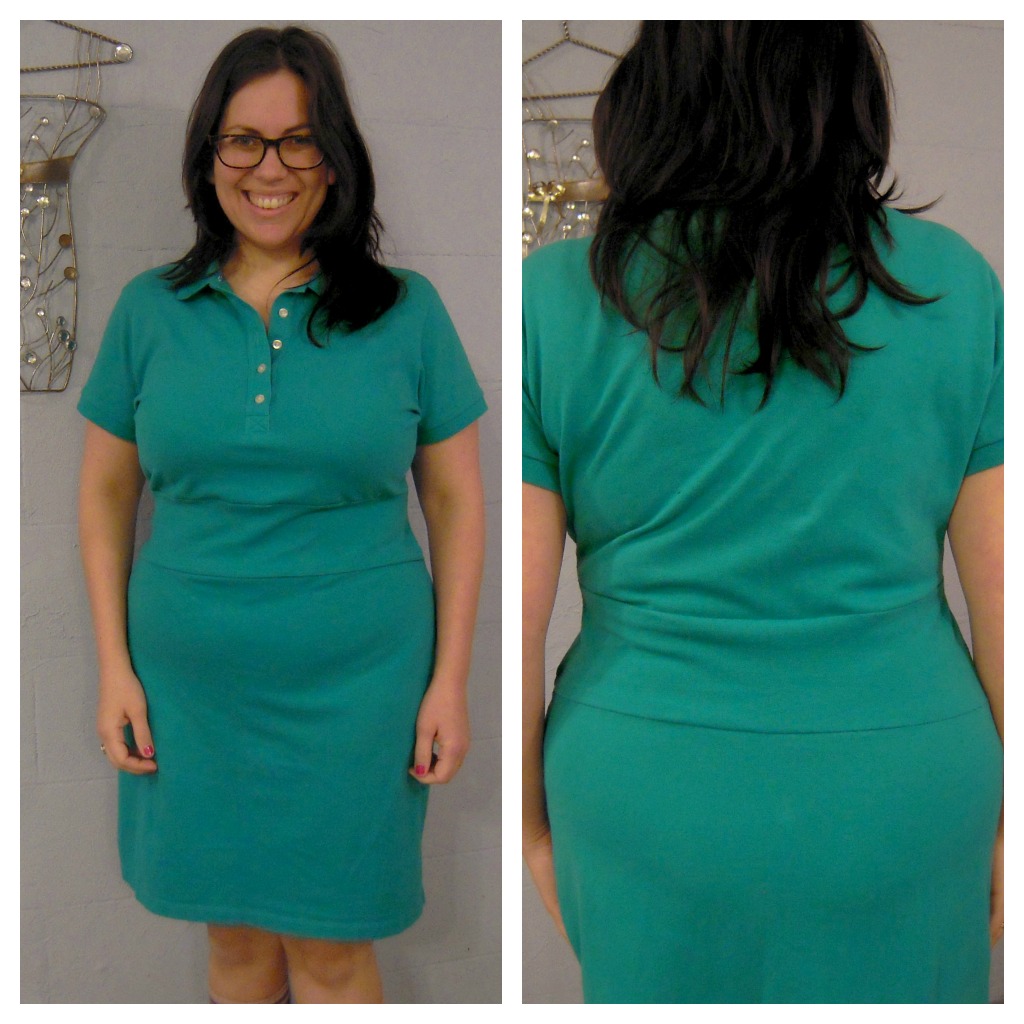
So, what’s the verdict? Was this tunic/dress worth saving? Does it look comfortable? Like something you’d wear lounging around your house? Any questions about the tutorial?
Thank you Darlene for inviting me to Hourglassy. I look forward to hearing what your readers have to say.
Warm welcome to the Hourglassy family on my behalf too Leila x Always so interesting to see your alterations! The dress was definately worth saving, looks so different after your magic. I’m not skilled in any arts or crafts so just keep to admiring those who are
Thanks Tina! I’m so glad to be here. I think this teal dress is a keeper.
Can you come fix all my clothes for me, please? Just kidding.
What I can never figure out is how much ease to put into a back. I’ve done some simple at home alterations and I never get it quite right.
hehee, I wish June.
The back is a tricky one. With knits it’s a little bit easier because if you go too tight you still have some wiggle room. With a woven material I go by Sandra Betzina’s general advice: “the garment back has some ease but no vertical or horizontal wrinkles.” I like having 0-2″ ease around my bust, 2-3″ ease at my waist and 3-5″ in the hips, all depending on what I’m making and whether there’s stretch in the fabric. And I’d much rather have vertical lines in my garment than horizontal ones. Horizontal means the garment is too tight and it’ll wear quicker.
Can you tell I could talk about this stuff all day? hehe. Let me know if you have any more questions like this or you can always send me a picture of something you’re trying to alter to askleila@hourglassy.com
Thanks so much, that helps a lot! I don’t have any specific piece I’m working on now, but I have a feeling post partum I will.
I think it was after having my kids that I started wanting things to fit better. You know where to find me.
Immediately had to order Tiramisu!

So looking forward to reading more in this column.
Thank you, Ladies
M, If you have any questions about that pattern let me know and definitely visit the sewingcake.com site. Lots of tips about sewing with knits and making alterations for a larger chest. That said, I’m a 34GG/32H and I used the size 30 bodice pattern piece for the back and the 40D bodice front piece and didn’t make any pattern alterations. Have fun!
What a fun series of experiments! I love the idea of buying several sizes too big – the couple of times I’ve done a refashion, I’ve been frustrated by how quickly I run out of fabric to do what I want! I”m also fascinated by the idea of a smaller back and a bigger front – makes total sense, but never occurred to me! Can’t wait to give it a try! Thanks, Leila!
The only area that suffers from buying too big are the armscye but if it’s big enough you can cut a shallower armhole opening and get a closer fit.
Yeah, my back and front are so drastically different and doing the smaller back and much larger front, and sometimes even with a little front lengthening, too, I can skip the FBA altogether- a little cheat I learned in doing Colette’s Violet blouse.
I love this. Looking forward to the rest of the series and seeing my draw of baggy, comfy clothes in a whole new light.
Thanks Clare! I hope this series helps move some comfy clothes to the front of your closet.
The green dress you altered looks SO much more flattering. It really looks like a completely different dress, well done!
I always have a fit issue in the bust area as well and have to buy bigger sizes. But, not for the reason you may think. I actually have long arms, long legs and broader shoulders, but a smaller bust. So, I have to buy big enough to fit the long arms and legs and then, it doesn’t fit in the bust. I will have to use some of the opposite techniques you describe to try to get my clothes to fit.
Interestingly though, if I were to alter a large fleece top in the same way as that first one you did, it would also be so much more flattering than the rectangle madness, as that top style also flatters and enhances a small bust! I think I’m going to try that with some of the comfy but flatter-free, :), sweatshirts that I own.
Thank you so much! Oh, yes, the rectangle madness. It’s awful on me. I look like I could take my kids camping in my shirt. hehe
What a great addition to Hourglassy! Darlene, this blog is just wonderful. Every single day you give us a new thought or resource for full-busted women. Thank you for all of the work you put into it!