In general, tops annoy me in RTW (and I don’t mean the specialized garments made for the large chested). The issue with mainstream Ready-to-Wear, and some sewing patterns, for that matter, is that the “bust” measurement doesn’t take into account a large bust. It’s really just a number that represents your circumference at the point of your bust.
It doesn’t account for the length of my front, for instance. It also doesn’t account for the fact that by comparison, my back is really small. When I sew for myself, I use one size for the front and at least 2 sizes smaller for the back…and it fits! I also make alterations for having smaller shoulders than the pattern assumes I have. Yeah, it’s all about assumptions. But the assumptions, at least for me with the Big 4 pattern companies–McCalls, Butterick, Vogue and Simplicity–are inaccurate. Actually, they’re inaccurate for a lot of my sewing friends. Check out Katie’s Big 4 Experiment to get the idea of what it would be like to use the size the envelope recommends and follow their instructions. It’s pretty impressive.
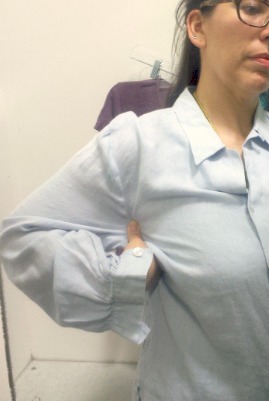
The fitting issues from the unaltered top are really familiar from my RTW buying days. All too familiar. Like this buttondown. Notice the shoulder? Even when I try to take in the sides, the shoulders get all funky.
I still buy RTW from time to time, but I have a checklist. If the item doesn’t check off most of the things on my list, I put it back and try to figure out what it is that I like about what I’ve tried on…and I try to make it at home.
Here’s my checklist of what works for me from RTW:
- Raglan sleeves: These work for me better than set in sleeves because my shoulders are narrow. I once tried on a well-fitting coat that had raglan sleeves. I was impressed with how well it fit. It was also a plus petite.
- Kimono, cut-on, dolman (they’re all in the same family): I like these sleeves because, like the raglan, there is no seam at the top of the shoulder which helps with different shoulder widths.
- Back seam: Even if a top doesn’t have a back seam, you can create one by folding the back in half lengthwise and stitching it down. You can not only take in a top that way (giving all the room for the front without bagginess in the back) but you can also add shape to that back seam as well as to the side seams for more waist definition.
- Knits: I find knit tops will fit better than a woven top. Woven fabric doesn’t have the give that knits have, but you must still make sure you don’t get a high-low look–unless that’s what you’re going for. Again, it’s the length of the bust that can cause a lot of ill fit. It’s not just width, as you know.
However, today I’m going to show you how I altered two buttondown shirts. With these purchases I just make sure I really like the style and color and that it’s a nice top, worth the time of making alterations.
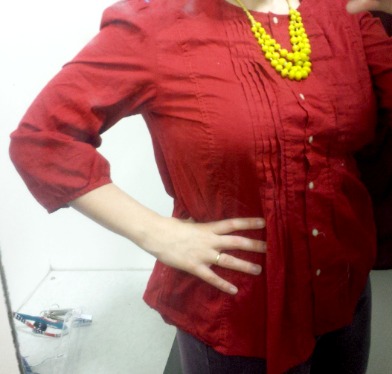
This red top I tried on was very pretty. I could tell I could alter it, but it made me look pregnant. Despite liking the color and the stitching, I left it behind.
What size do I buy?
Sometimes I can just buy off the rack in a large with either a raglan or a cut-on sleeve, but sometimes I have to take a top in, in which case I’ll buy an XL or larger. What I find is that the bust circumference is perfect with a L or XL, but the armholes are too low and it makes the top look frumpy on me.
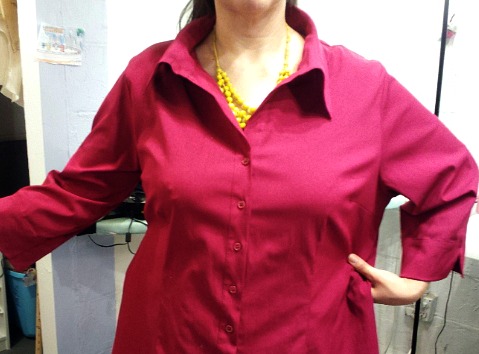
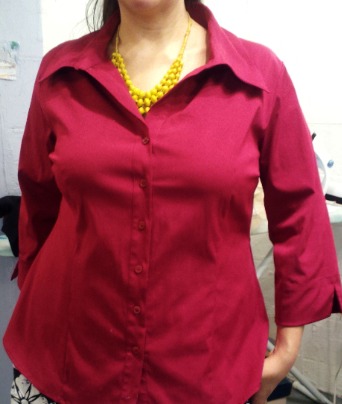
That’s what I did with this pink buttondown, though if you ask me, it’s totally PANTONE’s 19-2045 Vivacious. I bought it as a 1X. The shoulder seams were about 1.5″ off, basically on my upper arm. I basically needed to make sure I’d have enough fabric so to shape it to my curves.
I added a shoulder dart to the front and back at the shoulder, 1.5″ in from the neck. I wanted the dart to be concealed by the collar so it wouldn’t look like an alteration. I pinched out about 1″ out of each shoulder, leaving me with a better fitting shoulder. Below you can see the right side of the shirt with the dart and on the other shoulder, from the wrong side, a pinched out dart ready to stitch.
Start first with the shoulders and then move to altering the side seams. This is where you can wing it. Make sure you add shaping at the waist so your shirt skims your body.
I stitched from the sleeve to the curve of the underam and then down, gently curving in at the waist, and all the way down to the hem. I probably shaved off 3-4″ from each side. I suggest you start with an inch and keep shaving off more as you go. You can also measure yourself and measure your garment, but you don’t have to.
And finally, after doing both sides, I had a buttondown that fits and flatters.
What if you buy a top with a close fit that doesn’t give you the mobility you need? You could add a whole side panel like on this top, or you could add underarm gussets. I have a tutorial for adding underarm gussets. Granted, you’ll have to take out the side seams and part of the sleeve seam, so before you buy your RTW top you want to alter, make sure taking out the stitches is manageable. You can also see another underarm gusset tutorial here.
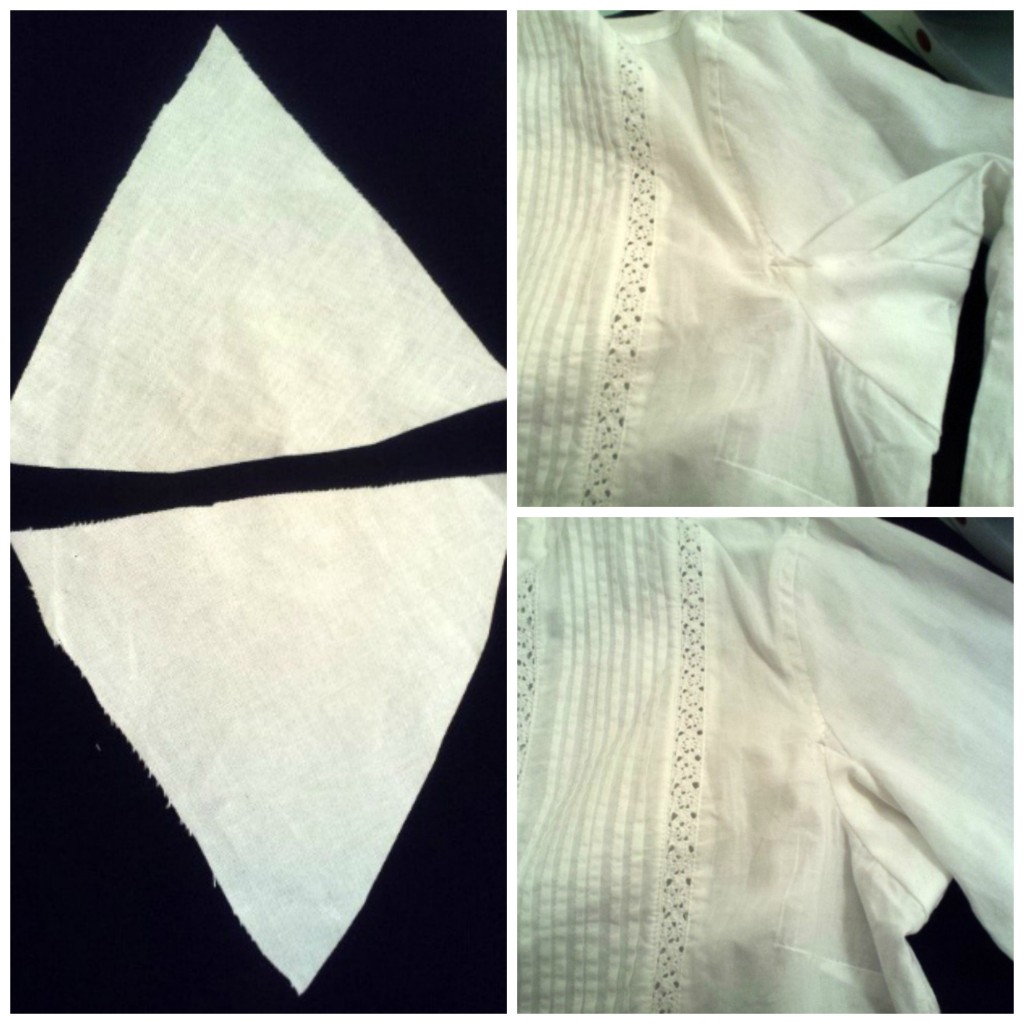
Now let me show you how I added underarm gussets to this white buttondown. The first picture shows that there is pulling at the side, with the pulls coming from the bust. Yup, it’s just too snug. The second photo shows the shirt with the underarm gusset in place and the last photo shows you the other side that hadn’t been done. I think the gusset makes for a nicer fit.
Drafting your gusset is a matter of drawing a triangle and cutting four of them, sewing each triangle to your underam and then stitching up the side seams. Sound too easy to be true? Just take it slow and you’ll be fine. Look through the tutorials I linked to above and ask any questions you have.
Here are two of my gussets freshly cut and inserted into the underarm area.
Inserting gussets will take a little more concentration than adding shoulder darts and stitching a new side seam, but after doing a couple of gussets you’ll want to put them in everything.
What’s the verdict? Do you think you’ll be doing this anytime soon? Do you think it improves the overall fit on the two buttondown shirts I bought?


Genius! I love the way you tucked the shoulder dart under the collar to make it inconspicuous. Great tutorial! Thanks!!
Raising the armhole . . .Genius! You just saves my wardrobe.